-
![]()
Sofia Albert
Sofia has been involved with tech ever since she joined the EaseUS editor team in March 2011 and now she is a senior website editor. She is good at solving various issues, such as video downloading and recording.…Read full bio -
![]()
Alin
Alin is a sophisticated editor for EaseUS in tech blog writing. She is proficient in writing articles related to screen recording, voice changing, and PDF file editing. She also wrote blogs about data recovery, disk partitioning, data backup, etc.…Read full bio -
Jean has been working as a professional website editor for quite a long time. Her articles focus on topics of computer backup, data security tips, data recovery, and disk partitioning. Also, she writes many guides and tutorials on PC hardware & software troubleshooting. She keeps two lovely parrots and likes making vlogs of pets. With experience in video recording and video editing, she starts writing blogs on multimedia topics now.…Read full bio
-
![]()
Gorilla
Gorilla joined EaseUS in 2022. As a smartphone lover, she stays on top of Android unlocking skills and iOS troubleshooting tips. In addition, she also devotes herself to data recovery and transfer issues.…Read full bio -
![]()
Rel
Rel has always maintained a strong curiosity about the computer field and is committed to the research of the most efficient and practical computer problem solutions.…Read full bio -
![]()
Dawn Tang
Dawn Tang is a seasoned professional with a year-long record of crafting informative Backup & Recovery articles. Currently, she's channeling her expertise into the world of video editing software, embodying adaptability and a passion for mastering new digital domains.…Read full bio -
![]()
Sasha
Sasha is a girl who enjoys researching various electronic products and is dedicated to helping readers solve a wide range of technology-related issues. On EaseUS, she excels at providing readers with concise solutions in audio and video editing.…Read full bio
Content
Sasha
Updated On 07/09/2025
0 Views |
0 min read
Reverb can add depth to recordings, but too much of it can make audio sound muddy or distant. Whether you're editing a podcast, cleaning up a voiceover, or restoring a music track, removing reverb can drastically improve clarity. In this guide, we'll provide you a step-by-step guide on how to remove reverb from audio using professional tools and techniques.
Remove Reverb from Audio Online Free
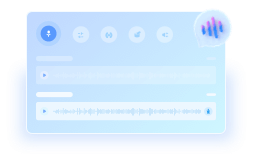
We listed the most straightforward method first for beginners who don't have to deal with a plugin or complicated software setups. You can remove reverb with online AI tools. EaseUS Reverb Remover is a new tool that helps you streamline the process. It utilizes advanced reverb detection and elimination to automatically eliminate the sustained sound that remains after the original sound source stops. The biggest benefit of it is that you upload your audio, whether in .wav or .mp3 format, then wait for the process to complete, and finally, you get crisp audio.
To use EaseUS Reverb Remover:
Step 1. Go to the official page of EaseUS Reverb Remover.
Step 2. Upload your local file by clicking the "Choose File" button or paste the link of the video/audio you are going to do reverb removal.
Step 3. Then click the "Start Separation" button to begin eliminating the reverb in your audio.

You could also get access to it by clicking here!
Powered by Advanced AI
Reduce Reverb from Audio in Audacity
If you know anything about Audacity, then you can use it to reduce reverb, too. Although it's not perfect, it's workable. You can use the Noise Reduction effect or the Noise Gate to remove reverb. Here, we show you how to use the noise reduction effect to do reverb removal. You can also find additional information here.
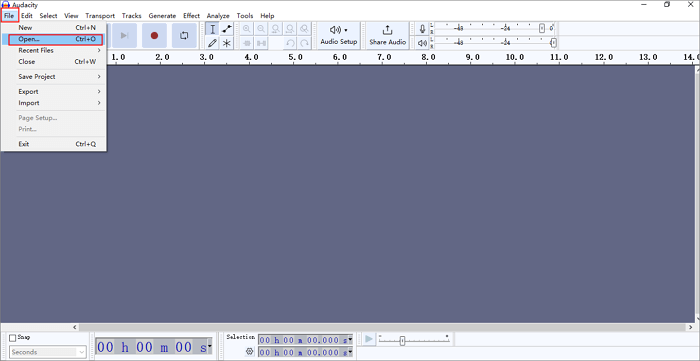
Step 1. Go to "File"> "Open" your audio file in Audacity.
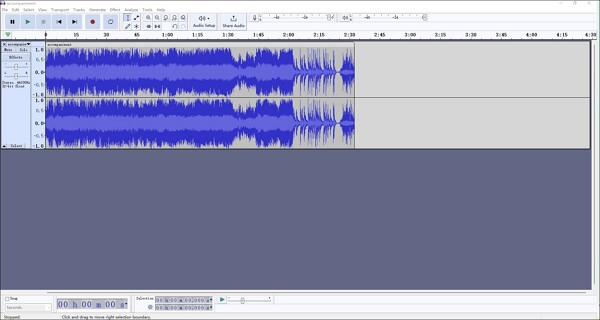
Step 2. Use Ctrl+A, or Cmd+A to select the track.
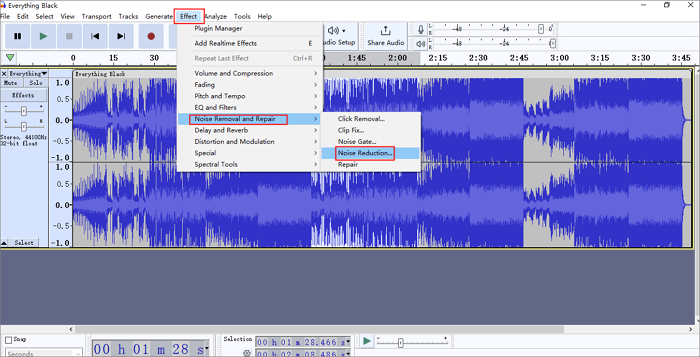
Step 3. Go to "Effect" > "Noise Removal and Repair" > "Noise Reduction," and select "Get Noise Profile."
Step 4. Follow the same path again and adjust the reduction settings using the noise reduction slider. Start with low sensitivity values, as they determine the strength of noise reduction. Keep the frequency smoothing between 1 and 6 for optimal results.

Step 5. You could also amplify the volume. Go to "Effects" > "Volume and Compression" > "Amplify..." and set the amplification dB. Click "Apply."

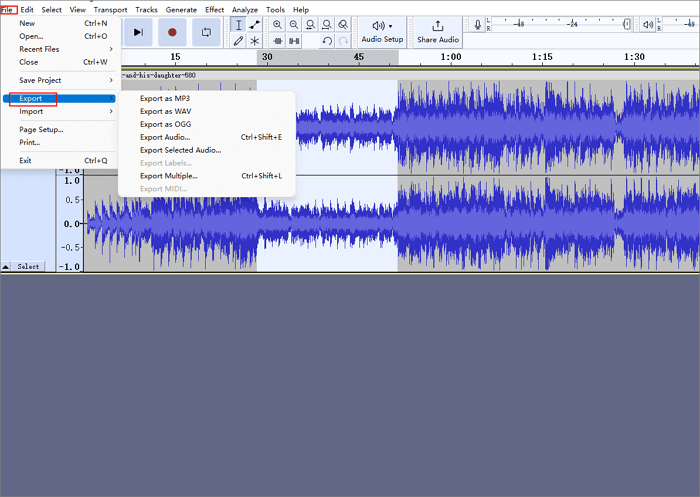
Step 6. Click "File"> "Export" and choose "Export as..." to save the final result.
Reduce Reverb in Premiere Pro
The built-in tool "DeReverb" in Premiere Pro also helps you minimize the amount of echo and reverberation present in your audio. Other tools like parametric EQ and dynamics with autogate can also be used in conjunction with DeRevern for more comprehensive reverb reduction. Please follow the steps below to remove reverb on audio in Premiere Pro.
Step 1. Import your audio with reverb to Premiere Pro, and drag it into the timeline.
Step 2. Go to your "Effects" panel and search "DeReverb" in the search box.

Step 3. Click on the effect, and drag it into your audio on the timeline.

Step 4. Then head over to your "Effect Controls" on the upper left of your panel, go to "DeReverb"> "Custom Setup," and click "Edit." This will open a small new window - Clip Fx Editor.

Step 5. Use the slider on the bottom to adjust the amount of DeReverb that you want to apply to the audio. The amount depends on how much reverb is in your audio.

🎆This video tutorial provides additional methods for removing reverb from your audio.

Remove Reveb in DaVinci Resolve
DaVinci Resolve, one of the most powerful software programs for video editing, color correction, and audio post-production, is also helpful for removing reverb in audio. Its "Voice Isolation" effect in its Studio feature does the job well. You could also use a third-party plugin like Wave's De-Reverb for more specialized reverb removal.
To reduce reverb in audio in Davinci Resolve:
Step 1. Import your audio into Davinci Resolve Studio.
Step 2. Go to "Mixer" at the middle right of your panel, and click the gray dot next to "Track FX," then voice isolation is running.

Step 3. Hover your mouse over the Track FX, and click "Controls."

Step 4. A small window appears, allowing you to set the level of voice isolation that will be applied.

Step 5. You can adjust and preview it. Also, remember that the amount depends on the number of reverbs in your audio.
Wrapping up
This article shares with you four ways to reduce and remove reverberation in your audio. For audio expertise, you can use Premiere Pro and Davinci Resolve Studio to process comprehensive reverbs. For users familiar with audio editing, try Audacity - it's free and powerful. For beginners, don't hesitate to start with EaseUS Online Reverb Remover.
Powered by Advanced AI
FAQs on How to Remove Reverb from Audio
Continue reading to discover how to remove reverb from audio.
1. Is it possible to remove reverb from audio?
Yes, it is possible to remove reverb from audio. Professional audio editing tools, such as Premiere Pro and DaVinci Resolve, offer built-in effects to achieve this.
2. Can Audacity remove reverb?
Yes, tools in Audacity, like noise reduction, noise gate, and EQ, can be used to remove reverb.
3. How to remove echo from sound in Audacity?
You can use noise reduction effects, noise gates, and de-reverb effects to remove echo from your sound. This page offers you the details.
Share it on: